As you may had known earlier , VMWare have capabilities to record the video
of the guest machine. Be it either you want to capture a movie during boot up, or after the guest OS is already booted up and running.
I would say it is a very useful stuff, especially when you’re going to document the step and screenshot for whatever reason.
I used to write some sort of note and tutorial for my own reference in the future.
Kinda a fact, after some period of time, I wouldn’t know anything at all about the past project or solution.
Difficulties of the skill level or small information stored doesn’t really matter,anyway. It could be very useful
when we trying to recall it back as we need to know that again later.
For example : I would not able to recall my own password which had been set in the previous 4-5 years.
it would very easy at that moment.. something really familiar.. but now.. all seem gone~.. i had to relate to every single small thing
that happening to me at that time .. then only can guess what the heck i was doing at that time.~.. hehe 8-)
Oh.. that is quite a long introduction.. i guess.. sorry.
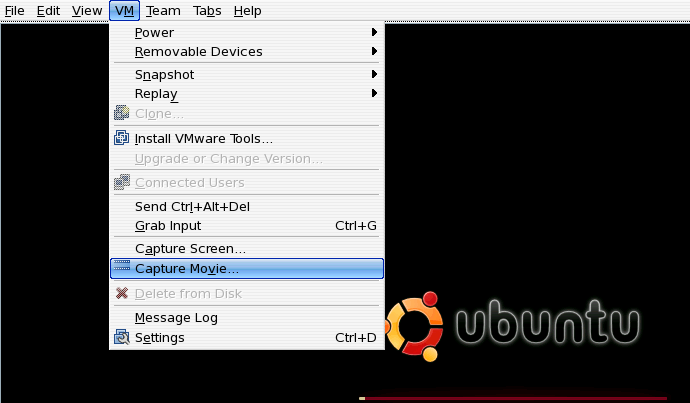
Ok. first we have to capture the movie in the VMWare..
For VMWare Workstation, you can find the feature under “VM-> Capture Movie ” or “Alt+M+V”
then it will prompt for the filename of the movie..
and.. the icon at the bottom taskbar will have something like this.
then do whatever you like to do with the guest OS and.. until done..
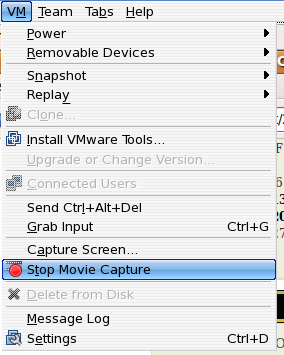
to stop the recording..just go to the same “VM->Stop Record”
then.. time to examine the recorded video..
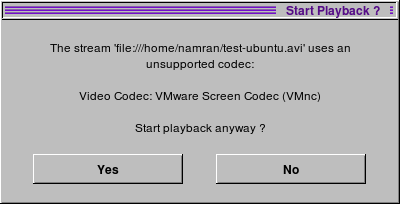
In CentOS , the video cannot be played with “Xine”.. as it popped up something like this..
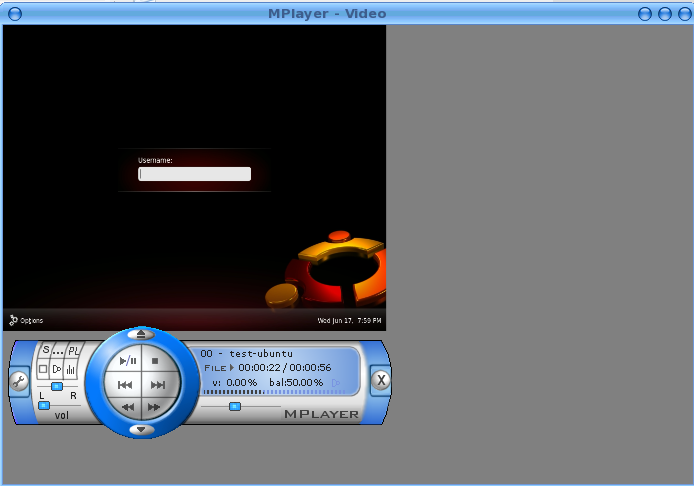
but that video can be viewed using “mplayer” .. just fine.
.. now we have to convert that video into something more readable or universal..
as I had tried to upload that video to youtube.. wait for two hours..
just to know that it was “Failed” because not recognized by youtube processing engine..
Ok.. to convert it to Windows Media AVI.
need to install something first. (provided DAG repo is installed.)
yum install mencoder -y the after completed
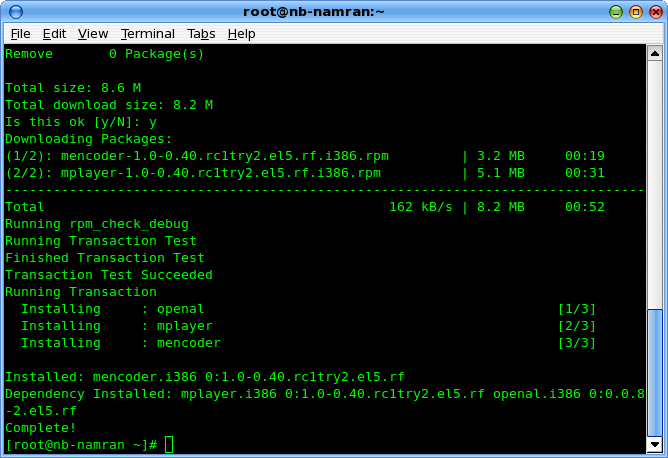
create a bash file file “~/bin/convert_my_vmware.sh”
#!/bin/sh
# usage convert_my_vmware.sh input.avi output.avi
/usr/bin/mencoder -of avi -ovc lavc $1 -o $2
as usual
chmod a+x ~/bin/convert_my_vmware.sh then we can convert any VMWare AVI video to Windows Media AVI. just by running.
~/bin/convert_my_vmware.sh vmware_recorded_filed.avi output.avi then.. this “output.avi” can be uploaded to “YouTube”
Hmm.. this interface somehow make me waiting.. as no progress bar during upload..
If you’re regular uploader , you might already known that youtube having duration limit of the video of “10min”..
else it will just said.. “Rejected:Video length too long.”
and you will have to re-upload the shorter version of it..
then next question popped up.. how to split the video ?
well..
#!/bin/sh
# usage split_my_video.sh input.avi
 /usr/bin/avisplit -i install_$1 -t 00:00-05:00,05:00-10:00,10:00-15:00,15:00-20:00,20:00-25:00
this will split it to 5minute block each..
~/bin/split_my_video.sh input.avi it will generate something like this..
[namran@nb-namran u]$ ls -l
total 328472
-rw-rw-r-- 1 namran namran  14716820 Jun 17 12:36 install_wm.avi
-rw-rw-r-- 1 namran namran   2430444 Jun 17 17:41 install_wm.avi-0000
-rw-rw-r-- 1 namran namran   2845890 Jun 17 17:41 install_wm.avi-0001
-rw-rw-r-- 1 namran namran   3203896 Jun 17 17:41 install_wm.avi-0002
-rw-rw-r-- 1 namran namran   3529222 Jun 17 17:41 install_wm.avi-0003
-rw-rw-r-- 1 namran namran   1570008 Jun 17 17:41 install_wm.avi-0004
There are other option for avisplit too..
avisplit (transcode v1.0.5) (C) 2001-2003 Thomas Oestreich, 2003-2008 Transcode Team

Usage: avisplit [options]

-i name             file name

-s size             de-chunk based on size in MB (0=dechunk)

-H n                split only first n chunks [all]

-t s1-s2[,s3-s4,..] de-chunk based on time/framecode (n:m:l.k) [off]

-c                  merge chunks on-the-fly for option -t [off]

-m                  force split at upper limit for option -t [off]

-o base             split to base-%04d.avi [name-%04d]

-b n                handle vbr audio [autodetect]

-f FILE             read AVI comments from FILE [off]

-v                  print version
Hmm.. then.. you might want to merge some of the video..
/usr/bin/avimerge -o $1 -i $2 $3 ~/bin/merge_my_video.sh merged_video.avi input1.avi input2.avi will spit something like this.
scanning file input1.avi for video/audio parameter

[avilib] V: 10.000 fps, codec=FMP4, frames=3065, width=1024, height=768

merging multiple AVI-files (concatenating) ...

file 01 input1.avi

[input1.avi] (000000-003064) (306500.00 <-> 0.00)

file 02 input2.avi

[ input2.avi] (003065-008525) (852600.00 <-> 0.00)

... done merging 2 file(s) in merged_video.avi

[avilib] V: 10.000 fps, codec=FMP4, frames=8526, width=1024, height=768
There are other option for avisplit too..
[namran@nb-namran u]$ avimerge

avimerge (transcode v1.0.5) (C) 2001-2004 Thomas Oestreich, T. Bitterberg, 2004-2008 Transcode Team

Usage: avimerge [options]

-o file                   output file name

-i file1 [file2 [...]]    input file(s)

-p file                   multiplex additional audio track from file

-a num                    select audio track number from input file [0]

-A num                    select audio track number in output file [next]

-b n                      handle vbr audio [autodetect]

-c                        drop video frames in case audio is missing [off]

-f FILE                   read AVI comments from FILE [off]

-x FILE                   read AVI index from FILE [off] (see aviindex(1))
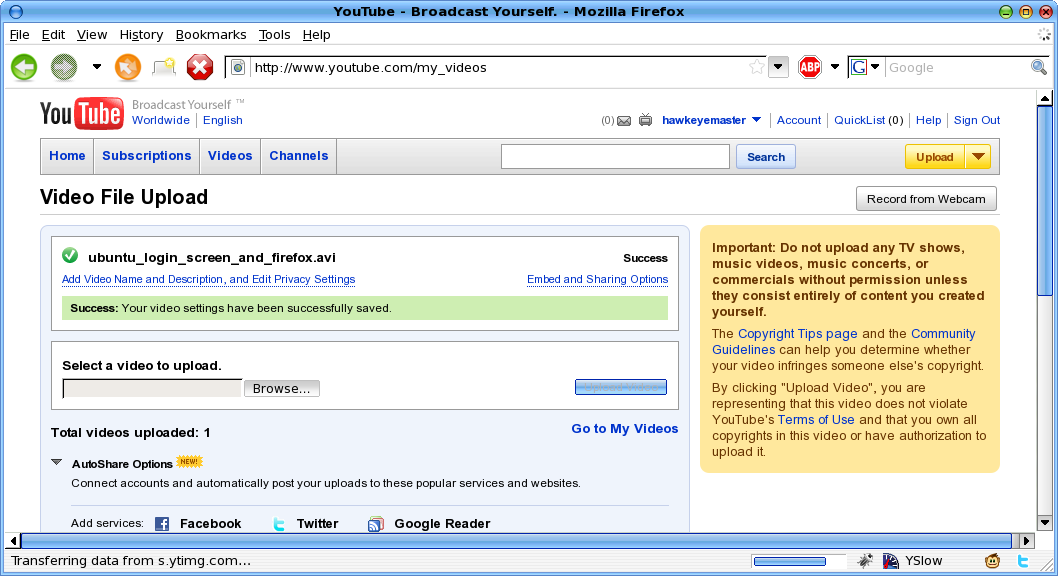
then.. can upload it to youtube as normal..
enter the definition.. and all..
Hmm.. the title would be based on the filename of the video file..
after done uploading(saved)..
have to wait till processing finish..
the example of uploaded video is as below :
47TWstHOsSQ
References :
1. http://www.kelvinism.com/howtos/convert-vmware-movie-flv/
2. http://lifeeditor.blogspot.com/2008/01/convert-and-split-video-fiel-in-linux.html
3. http://help.youtube.com/support/youtube/bin/static.py?page=start.cs&hl=en-US
p/s : It could have been easier…*sigh*
Leave a Comment